I first learned to sew when I was 8, by the time I was in my late teens I was making elaborate dresses from store bought patterns and now I design and make dresses for Bug; now I want to share what I know how to do with you! Here is a step by step tutorial on how to make extra large receiving blankets and tomorrow I will post on how to make burp cloths to complete a beautiful set of baby necessities that can be gifted with love while not breaking your budget.
First things first, Are you making a set for a boy or girl?
Now when making receiving blankets and burp cloths you want to use flannel fabric, it is warm, soft and breathable. Flannel is made of cotton and has a soft weave that holds up to washing while not being scratchy. Trust me, no baby wants scratchy.
****Tip: Sign up for your local fabric store coupons, the store I shop at is a national chain who offers amazing coupons if you know how to shop properly. Check your coupons, some many not be combined with items already on sale or they may only work on specific days. This will help keep your cost down.****
I personally prefer to make my blankets with a ratio of 2 solid color blankets to one print. I pick the print I love the most for the specific baby I am shopping for and then find a solid that matches. Don't forget to grab a thread that matches! If I am making a full set of blankets and burp cloths I purchase 3 yards of a solid color and 2 yards of a print.
I fell in love with this mermaid print!
I use a cutting mat and cutting wheel with a ruler to cut my fabric to the proper size. I cut the blankets to a 44 inch x 44 inch size. Generally the width of flannel fabric is around 44 inches so I cut the length to match.
****Tip: When you purchase a fabric the ends need to be shored up. Meaning the fabric store cutting counter, despite their best intentions do not cut the fabric straight so you will need to make a cut to straighten the end pieces of your fabric. Do this by lining up the folded edge or selvage of your fabric with a line on your cutting mat and using the ruler to line up the cut edge.****
Shoring up roughly cut edge
Nice and straight!
Once you have shored up your fabric and then cut it to the appropriate size take a coffee cup and place it on the corner of your fabric the using your rotary cutter (or pen to make a line if you are using scissors) cut the fabric to round the corner off. You can make square cornered blankets, I prefer rounded corners.
You can also mark out the edge using a pen and the bowl as your guide if you are using scissors.
Now it is time for my favorite part, sewing! Now we are just going to use a basic running stitch, Take the edge of the blanket and fold it over 1/4 of and inch then fold it over again 1/4 of an inch. This will allow for you to seam the blanket edges while not making the seam too large or too small to where it can unravel and fray. I personally start in the middle of one side of the blanket to seam the edge. Starting to close to the corners will make it harder for you to sew.
First fold
Second fold
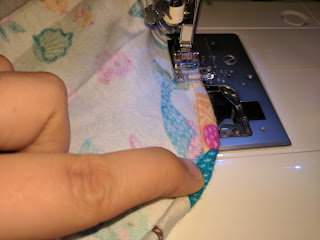
Sew until you get to the corners, at the corners you will need to fold and gather some of the fabric so the corner stays rounded and smooth.
Lining up your hem
Approaching a rounded corner
Starting the rounded corner
Coming out of the corner
Continue sewing until you have done all sides. When you are seaming the blanket do not stop at any point in the stitching, try to make one continuous seam. Remember each time you stop and start will mean more back stitching to hold the seam in place which means more bulk and makes the blanket look messy. Once you have finished seaming trim any excess tread from your initial start and finish of the seam.
You are now an accomplished receiving blanket maker! Congrats! And don't forget tomorrow I will show you how to make matching burp cloths.


No comments:
Post a Comment