Friday, February 17, 2017

The Perfect Waffle Batter

My family, just like any other, has busy days and slow days. Busy days are particularly hard on me when it comes to getting everything done and making dinner. Luckily, for those super busy days my fall back meal is breakfast for dinner. I believe there is nothing better than eggs, bacon, fried potatoes, toast and orange juice! I grew up eating these staples every morning, my husband however grew up on a slightly different version of breakfast. His family isn't big on toast and fried potatoes so they would have pancakes. As newlyweds my husband would try to impress me with his pancake making skills. He was so sweet and he does make good pancakes, I just don't like pancakes. Fast forward a couple of years into our marriage and we had found the perfect compromise by having waffles instead of potatoes or pancakes. We discovered that I can have yummy chocolate-y Nutella on my waffles and he can have his syrup. It is the best of both worlds!

It took lots of trial and error but I found the perfect waffle recipe and I want to share it with you.

This recipe makes 4 large Belgium style waffles in my 10 inch round waffle iron.

2 cups flour
2 tablespoons baking powder
3 tablespoons white sugar
1/2 teaspoon salt
2 eggs
2 tablespoons oil
2 cups milk


Turn that waffle iron on so it is good and hot by the time you are finished mixing!

Place flour, sugar, salt and baking powder in a mixing bowl and whisk together.


Dry Ingredients


Whisk in half of the milk (adding all the milk at once will have the undesirable effect of milk sloshing out of the mixing bowl while you or your mixer stirs the batter)

Batter will be thick at this point


Add eggs and oil mix thoroughly

Starting to mix

Eggs and oil fully incorporated


Add remaining milk and whisk for 1 minute.

Batter will be on the thin side once fully mixed


For immediate tasty waffles pour or ladle batter into your waffle iron that has been generously sprayed with cooking spray.

The batter also stores well for about 3 days when put in a sealed container in the refrigerator.


You can also mix all the dry ingredients ahead of time and put them in a freezer bag to be stored in the freezer, then simply write the rest of the recipe on the bag for easy meals later on.


These tasty treats can be served with Nutella, butter and syrup, berries and whipped cream or any other way that pleases your palate.

What are some of your favorite toppings?

Wednesday, February 15, 2017

Adorable Baby Burp Cloths

Yesterday I showed you how to make receiving blankets and I promised I would show you how to make adorable burp cloths to finish the set. Today we are going to use an adorable truck fabric !

We discussed picking fabric in my previous post, check here if you haven't already see my suggestions.

When making baby burp cloths you use a significantly smaller cut of fabric than with the receiving blankets. I usually use the left over pieces of fabric I have from cutting the blankets to make these cute and absolutely necessary items. 

First, start with a folded piece of the print flannel. You will cut this piece down to 14 inches x 10 inches. (14 inches is a good length to cover a shoulder and part of a back while 10 inches is wide enough to cover the shoulder from neck to arm) Your fabric piece should be large enough for you to cut 2 sets of print flannel cut out. Cut the fabric 14 inches long and the width will be wide enough to allow you to cut two 10 inch wide burp cloths. 

+
Lay out your fabric and cut it 14 in long

14x10 inch pieces

Repeat this process on the solid color flannel. 

At this point you should have 8 pieces of flannel cut. 

Take a cup and round the corners off either by using your rotary cutter or marking the fabric with a marking pen and then rounding the corner with scissors.


Use the remaining fabric left over from cutting out the burp cloths pieces to make binding strips for the edges of the burp cloths. Cut 2- 2 inch wide strips.  (I prefer to use the solid color flannel for the binding)


Now you will layer the fabric for the burp cloths. You will use 4 pieces per burp cloth, I like to put the print on one side and the solid on the other.


Once the pieces are layered line up the edges and use your ruler to draw 2 straight lines 1 1/2 inches on either side of the center of the burp cloths. These lines once stitched will hold the layers of fabric together and stabilize the burp cloth.


Stitch along the lines that you have drawn.


Now place one edge of the binding strip on the edge of the back side of the burp cloth, you will place it so the width of the strip is laying towards the inside of the burp cloth. 


Begin stitching 1 inch away from the end of your binding strip, you should have a one inch tail left free from stitching. This will allow you to fold the strip over when finishing. Stitch the binding strip down with a 3/8 of an inch seam. As with the blankets start in the middle of the bottom side of the cloth.

Over lap the free ends of the binding once you have stitched around the entire cloth.


Once finished the first stitch of the binding will look like this.


Turn the binding over the edge of the burp cloth.


Fold the edge of the binding under and stitch it down with a 3/8 of and inch seam.


Stitching rounded corner.


Trim the thread left from your starting and finishing stitches and you are done!


These adorable burp cloths are a great way to get the most out of your fabric purchase and are perfect to complete a set of baby essentials. Congrats you are now well versed at making baby burp cloths! You will now have a perfect present for the new mom and dad and of course the little bundle of joy. 

Here is a photo of the matching burp cloths for the Mermaid print I used yesterday, just in case you were wondering how they came out.

Tuesday, February 14, 2017

Warm Blankets of Love!

I LOVE to sew and in honor of Valentine's Day today I decided to share my favorite hobby with all of you. It is currently baby season for my friends, I get very excited about babies. I wish I had one right now because they are so cute and smell so wonderful, but alas I am baby-less. So, instead of using my spending money to buy items I don't need, I buy fabric and make baby blankets and burp cloths for my friends. This way I am getting my sewing, shopping and baby fix all in one while doing something nice for my friends. It is so satisfying to see the look of joy on someone's face when you give them a heartfelt and handmade gift for the little one that they are so excited about.

I first learned to sew when I was 8, by the time I was in my late teens I was making elaborate dresses from store bought patterns and now I design and make dresses for Bug; now I want to share what I know how to do with you! Here is a step by step tutorial on how to make extra large receiving blankets and tomorrow I will post on how to make burp cloths to complete a beautiful set of baby necessities that can be gifted with love while not breaking your budget.

First things first, Are you making a set for a boy or girl?
Now when making receiving blankets and burp cloths you want to use flannel fabric, it is warm, soft and breathable. Flannel is made of cotton and has a soft weave that holds up to washing while not being scratchy. Trust me, no baby wants scratchy.

****Tip: Sign up for your local fabric store coupons, the store I shop at is a national chain who offers amazing coupons if you know how to shop properly. Check your coupons, some many not be combined with items already on sale or they may only work on specific days. This will help keep your cost down.****

I personally prefer to make my blankets with a ratio of 2 solid color blankets to one print. I pick the print I love the most for the specific baby I am shopping for and then find a solid that matches. Don't forget to grab a thread that matches! If I am making a full set of blankets and burp cloths I purchase 3 yards of a solid color and 2 yards of a print.

I fell in love with this mermaid print!


I use a cutting mat and cutting wheel with a ruler to cut my fabric to the proper size. I cut the blankets to a 44 inch x 44 inch size. Generally the width of flannel fabric is around 44 inches so I cut the length to match.

****Tip: When you purchase a fabric the ends need to be shored up. Meaning the fabric store cutting counter, despite their best intentions do not cut the fabric straight so you will need to make a cut to straighten the end pieces of your fabric. Do this by lining up the folded edge or selvage of your fabric with a line on your cutting mat and using the ruler to line up the cut edge.****

Shoring up roughly cut edge

Nice and straight!


Once you have shored up your fabric and then cut it to the appropriate size take a coffee cup and place it on the corner of your fabric the using your rotary cutter (or pen to make a line if you are using scissors) cut the fabric to round the corner off. You can make square cornered blankets, I prefer rounded corners.

You can also mark out the edge using a pen and the bowl as your guide if you are using scissors.


Now it is time for my favorite part, sewing! Now we are just going to use a basic running stitch, Take the edge of the blanket and fold it over 1/4 of and inch then fold it over again 1/4 of an inch. This will allow for you to seam the blanket edges while not making the seam too large or too small to where it can unravel and fray. I personally start in the middle of one side of the blanket to seam the edge. Starting to close to the corners will make it harder for you to sew.

First fold

Second fold


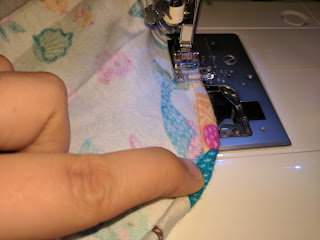
Sew until you get to the corners, at the corners you will need to fold and gather some of the fabric so the corner stays rounded and smooth.


Lining up your hem

Approaching a rounded corner 

Starting the rounded corner

Coming out of the corner


Continue sewing until you have done all sides. When you are seaming the blanket do not stop at any point in the stitching, try to make one continuous seam. Remember each time you stop and start will mean more back stitching to hold the seam in place which means more bulk and makes the blanket look messy. Once you have finished seaming trim any excess tread from your initial start and finish of the seam.


You are now an accomplished receiving blanket maker! Congrats! And don't forget tomorrow I will show you how to make matching burp cloths.


Monday, February 6, 2017

Scissors = Anarchy

Now let me set the scene for you… years of skill and trade knowledge gleaned from those masters of repair Handy Manny and Bob the Builder have coalesced into a brilliant idea inside my child. We have secured building materials in the form of one large box, yellow masking tape, a butter knife and a pair of scissors absconded from grandma’s block of kitchen knives. So without further ado construction begins. The cutting and prep work assisted by the warden of my childhood aka Grandma, who thought fun was a four letter word, has been carefully done. You know how they say “the best laid plans of mice and men” well this is where everything falls apart.
During the taping of the newly created shutters for this box palace my child sticks her hand into the carefully negotiated for scissors and proceeds to discover that the handle is cracked. She discovers this not based on a visual inspection but based on the fact that the scissors themselves opened like the gates of Hell and then snapped shut on the skin between her thumb and index finger. Now the real fun begins, said child begins screaming, said warden of fun comes running into the room upset by the howls of her progeny one generation removed, I being accustomed to the howls, screams and laments of the aforementioned child maintain a state of Zen like calm. We remove the offending scissors and so begins my job of calming two very upset females down.

NOTE:
If you ever find yourself in this position know that you will need two glasses of cool water, one band-aid, antibiotic ointment and a comfy seat to sit on while you work. First you will begin by removing the offending item, in this case the scissors, from the sight of the victim. Second, apply cool water in the form of drink. This does two things 1) it will help the injured and/or hysterical parties focus on something other than what just happened and 2) it will stopper their cake holes so you don’t have to hear them scream. Third, make a joke or some other situation to create laughter. Fourth, cuddle and rock the injured party. Lastly, apply bandage and ointment.

Carrying on….
After 20 minutes of hysterics we have reached a level of normalcy. There are sniffles and snuffles emanating from my offspring and apologies flying from my mother. I, trying to make the best of the situation by suggest we throw away the scissors, “with extreme prejudice,” to help lighten the mood. My mother sensing my meaning goes to the kitchen with my child and makes a big show of throwing the scissors away. This idea is accepted to much acclaim by the victim and we proceed to watch as my mother throws the scissors into the trashcan. Then the universe decided to add to the fun, apparently if you throw scissors away with enough force into a plastic 13 gallon trashcan you run the risk of them deciding to exhibit a shocking capability to bounce out of said can and become a weapon.

Well as you may very well have guessed the scissors flew out of the trashcan but this time they decided to release their rage on my mother. She is subsequently is stabbed in the foot by rouge scissors, which scares not only my daughter who is watching this but also her 10 month old puppy. Now the puppy, who we can call the tiny terrorist, is so shocked by this series of events that he yelps and takes off running from behind my mother. He regrettably heads in the direction of his owner, presumably for comfort, who happens to have her grandmothers 7 month old cat standing next to her. This causes the cat to bolt, running into my daughter who then suffers the full force of her puppy running into her as well. These events lead to the rebirth of screaming and crying which is again handled as outlined above and after another 15 minutes of plying my trade as a mother, everyone is calm.

At which point I notice the front door of my parents home open very slowly and see my father cautiously stick his head in as if he was a turtle looking out of a shell. In this moment the look on his face tells me he has been standing outside the door for some time and decided not to come in because of the demonic wailing and moaning that has been emanating from his home for over half an hour. I suddenly wish I had been given the choice to hide outside but as all has become right in the world I put it behind me and enjoy the rest of the G rated animated movie we are watching, because a girl needs some cultured entertainment.


And all this because of dumb construction shows… 

Tuesday, January 10, 2017

Camping and Laughter are the glue to my marriage

Our epic weekend of camping is well down in the books, we have been home for a few days and I, after recuperating, am sorting out and organizing our camp kits so we can store them away.

What is a camp kit you might ask? Well, for us it is two large plastic storage totes that are like little survival kits. We have everything in them, cooking utensils, skillets, snacks, oatmeal, drink mixes, a cook book, bug spray, shower supplies, you name it and we probably have it in the kit. It is how Bug and I survive camping, it has necessities but also our creature comforts. It truly is amazing what can fit in those storage totes and what I have in them! When I open the camp kit I feel like Mary Poppins, pulling stuff out from an impossibly small container.

But alas, to be able to procure such a trick takes careful planning and packing. So it takes me a few days usually to repack and replenish my camp kits. So I have been slowly working on cleaning and restoring my kits for our next trip. Here in lies the rub, the kits are not exactly small and they are literally taking up a chunk of our foyer. Then as I slowly sift through all the items we bring back with us from camping I find things that belong in the kits and have to put them back in, consequently taking up more space.

You may be asking what items I am finding because a spatula in a sleeping bag seems odd. But it is more like my daughters hair ties that I pack in the shower bucket, the dogs water bowl that needed to be washed or the bug spray that ends up anywhere and everywhere (this time it was in my husbands back pack). As I find these items I put them on top of the kit they belong to and sit down to put them in their proper place only after everything is sorted.

After camping this weekend with friends my husband has had a rough time getting into the swing of this week and decided to try to save time in his morning routine by putting his deodorant on the table by the front door, so he wouldn’t forget to give himself a few sprays before leaving the house. He has been trying a new dry spray deodorant and has noticed the last two days that the deodorant is starting to sting him during and after application, so he has developed the opinion that dry spray deodorant is not for him. 

He addressed this concern while I was repacking the camp kits, and as he explained this to me he walked to the foyer table to retrieve his deodorant can when I heard him make a disgruntled noise. Ever wife knows that disgruntled noise their husband makes, the one where it is resignation, self depreciation and frustration all rolled into one sound. This all encompassing noise made by my husband was followed by him coming back to the living room holding his deodorant in one hand and our very powerful outdoor bug spray in the other. Now my hubby has had serious allergies and can't smell a thing lately so when he applied the deodorant he missed the fact that he sprayed himself liberally with outdoor woods bug spray! The best part is he only has himself to blame because he had been rooting through one of the camp kits a few days before and as you may recall all items I find in our camping equipment goes on top of the kit until I put everything back in at once. Well, before his invasion of the camp kits he removed all the items from the top which included the bug spray, which he failed to put back where he found it. 

There is a saying that to make a woman fall in love with a man and stay in love with him all a man has to do is make her laugh. Well all I can say is my husband has that ability in spades and I must be the most in love woman in the world based on his shenanigans. 


Sunday, January 8, 2017

The world keeps turning

I remember my last day of work as if it was only a few months ago instead of nearly three years ago. I remember my last break, I remember signing out and not going back. I left the job I had been doing for the better part of a decade. I had built friendships, and connections, I belonged there…but for some crazy reason I was leaving, I was leaving my comrades in arms, people who I cried with on bad days and who I cheered with on great days.

I walked away from something that was fulfilling, at least at the time that is what I thought. I enjoyed going to work and making money, I enjoyed sitting down every day and solving problems. A person’s day could be made or broken by how well I did my job and that felt good. But, it was time for something new. I had a 4 year old at home who desperately needed me and a husband who wished I was available more. So I walked away, I walked away to help make instead of break the days of the two most important people in my world.

I decided with my husband’s encouragement to be a full time stay at home mom. This choice would give me the luxury of crafting my days with purpose and a plan. I was free to take my daughter for walks, meander through the grocery store without having to worry about the list of errands stacked behind my required weekly trip to the store so my family didn't starve. I could read books, take naps, play with my daughter, home school like I was Pinterest embodied into human form and have a perfectly clean house.

Then…. reality set in. My daughter stays up all night and sleeps all day so when she gets up its too hot to take walks, going through the grocery store at a leisurely pace only increases my grocery bill and fills our pantry with junk food. It took me 2 years for find a book that I loved and then I blew through the series in a matter of months, my daughter has found independence and wants her private time, home schooling is definitely not as pretty or easy looking as Pinterest and my house being clean consists of me at least sweeping the dog and cat hair up everyday.

When we take the plunge and enter the new world of the stay at home parent we are so confident that it will be easy and wonderful, because who doesn't know how they would spend those extra 10+ hours a day. Well as with all things, except ice cream and chocolate, it isn't as easy or as liberating as you would expect.

My weeks now fly by with my daily list usually having chores, home school, cook dinner, sweep and wash dishes on it. By the time I finish those items on my list my husband is walking through the door and I realize I never brushed my hair or changed out of my PJs.


Now please don’t misunderstand I wouldn’t change a thing about my life now. I would need to be hog tied and dragged back to working full time and even then I would run away. I love spending time with my daughter, seeing her learn and watching a spark take root and grow into a burning desire to learn more. I enjoy when my husband thanks me for a wonderful dinner and he never once has mentioned my PJ wardrobe. I feel as if I am making a bigger difference in the world by being out of it than I ever did being in it. The world keeps turning and people keep moving at the speed of information but as for me and my house, we will move at the speed of childhood, at the speed of a good cuddle and a good book, at the speed of love and togetherness.